tcPlugins updates
I realised recently that since moving from Source Forge to Github, the tcPlugins user base is more actively engaged, and conversations tend to happen there rather than here.
So here is a quick recap of the last few years.
tcWebHooks – Outbound webhook support for TeamCity
Version 1.1 was released in November 2018. This release primarily added support for templated webhook payloads and a bunch of other improvements. See the upgrading page on the wiki for a list of changes.
TeamCity plugin competition
In December 2016 I entered the TeamCity plugin competition by writing the tcDebRepository plugin in six weeks. I was awarded the special prize which allowed me to visit the TeamCity development team in Munich.
I had an amazing time meeting the team and learning more about the product. I’d like to thank the team for making me feel so welcome.
tcDebRepository – Debian Package Server in TeamCity
My entry in the competition was the tcDebRepository plugin, which allows TeamCity to function as a Debian Package Server serving build artifacts in a manner that’s compatible with Debian’s apt tools.
I’m currently working on updates to this plugin which will support the most recent Ubuntu versions. This includes GPG signed Release files and hash support for Package listings and other meta-data files.
Posting to Atlassian Stride from TeamCity
Stride is the new collaboration and communication tool from Atlassian. It is the replacement to the old hipchat system which was one of the first chat programs that tcWebHooks supported.
Stride has recently become available for public use and utilises an authentication protocol that tcWebHooks didn’t previously support.
The most recent 1.1 release of tcWebHooks now supports both basic and bearer authentication which allows posting to a Stride room.
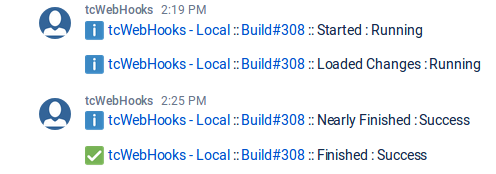
Posting a message to a stride channel requires a specially formatted JSON payload. Working with the tcWebHooks community, we have developed a template which provides simple success and failure messages and I’m sure as more users come on stream we can make this more sophisticated. This is what it currently looks like in a Stride room.
tcWebHooks is a plugin for TeamCity which provides the ability to initiate post requests for events during the build lifecycle.
Posting to Stride is as simple as:
A better way of integrating TeamCity with Slack.com using WebHooks
I wrote a blog post in 2014 about how it’s possible to get tcWebHooks to send messages to slack. It turned out to be one of the more popular posts.
The good news is that in version 1.1 of tcWebHooks, it got whole lot easier.
TL;DR
- Install the latest tcWebHooks 1.1 (or higher) plugin into TeamCity.
- Create an incoming webhook in slack.
- Create a webhook in TeamCity and choose from one of the Slack payload formats
- That’s it!
Bundled Slack WebHook Templates
As of the time of writing (December 2017), there are two Slack specific webhook templates bundled with a tcWebHooks release.
1. The “Slack.com JSON templates” payload format has templates which produce a message in slack with some information about the build.
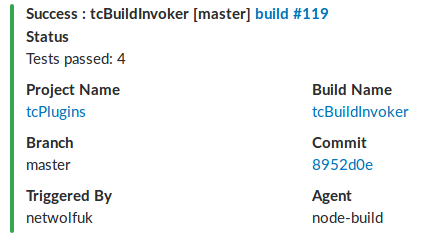
2. The “Slack.com Compact Notification” has templates which produce a more compact notification.

If neither of those are right for you, it’s possible to create your own template by either copying an existing one, or creating a new one.
WebHook Templates
A WebHook Template is a predefined payload that can be reused with multiple webhook configurations. I’ve prepared a few to get you started, but it’s very easy to modify them or create your own. The ones bundled with tcWebHooks include:
- Slack
- Slack compact (also works well with MatterMost)
- Elastic Search
- Flowdock
Creating or editing templates is accomplished using a WebUI built on top of the tcWebHooks REST API. Further information about WebHook Templates is on the wiki.
Maven, SonarQube, JaCoCo, Lombok and TeamCity
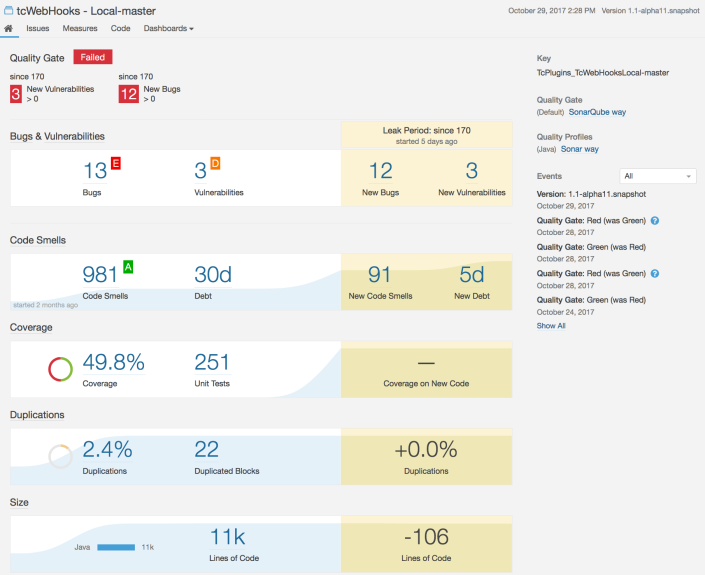
As part of striving for better, I’ve added a build step in TeamCity to the tcWebHooks build to analyse my code in SonarQube. This has revealed a large amount of debt (30 days) to tidy up, and I plan to tackle that as I work on the code base. You can see a screenshot of the analysis by SonarQube below.
During this exercise I realised that a number of the tools required were already supported by TeamCity with built in features or external plugins, and I didn’t have to make changes to my build (pom.xml). I understand that this is arguably not a great solution if you adhere to the configuration as code philosophy, because the Sonar configuration – and the steps to invoke it – now live outside of the source code I have in git.
For my webhooks plugin I have full control of the process from coding to Continuous Integration (CI) to automated deployment in test (CD) and then to doing a release on GiHub. However, I have worked in environments where the CI team is not necessarily the same as the development team. In one of my roles, when we were first moving to a CI model and encouraging as many development teams as possible to try CI, I was that guy. I owned the server and its configuration, but had no commit rights on any of the hundreds of builds my server ran.
That is why I can understand both sides of the argument for putting sonar configuration in the project POM in git, versus in the TeamCity build configuration – which can also be in source control.
One other consideration, is that I have the build running on two build servers. One runs at home on a local TeamCity instance, and one runs on the Jetbrains TeamCity instance which they generously make available for qualifying open-source projects.
My local build runs Sonar analysis on every local commit. This may seem like a waste, but I am coding on my own time, and therefore want rapid feedback when I am coding, not on some nightly build, which I may not get a chance to review for another week. Running this build on own TeamCity instance lets me interact with my own Sonar server (running in a docker instance) and also allows me to install any plugins I want, which I obviously can’t do with the Jetbrains TeamCity instance.
Adding JaCoCo test coverage analyser
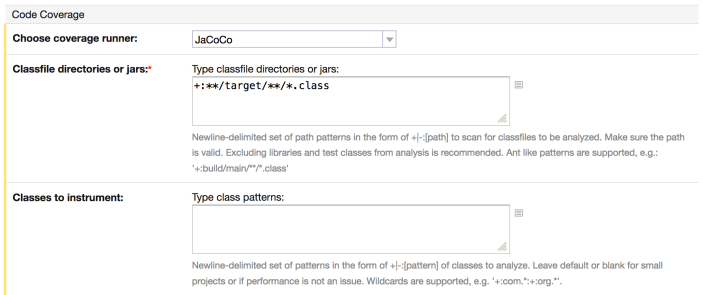
JaCoCo is easy to enable in TeamCity. My build uses Maven, so I go into the the build settings, and edit the Maven build step. Under Code Coverage, choose JaCoCo as the coverage runner and add the classfile directories. My build is a maven multiple project build, so am I using ** at the start to let JaCoCo find all the classes from all the sub-projects.
Setting up a SonarQube instance
For me, I just run SonarQube using docker-compose, based on a clone of harbur/docker-sonarqube. I did this a while ago, so there is probably a better way now.
Running Sonar as part of your build
In TeamCity, Sonar support can be added by installing the SonarQube plugin. This plugin was developed by a TeamCity team member, and allows the configuration of SonarQube servers at any project level (eg, _Root or below that), which are then available to submit analysis to. See the docs for the plugin for info on adding your SonarQube server to TeamCity.
The SonarQube plugin also adds a new Build Runner, so invoking the Sonar scanner is configured as a build step on your build configuration in TeamCity.
Here are the settings from my Sonar build step.
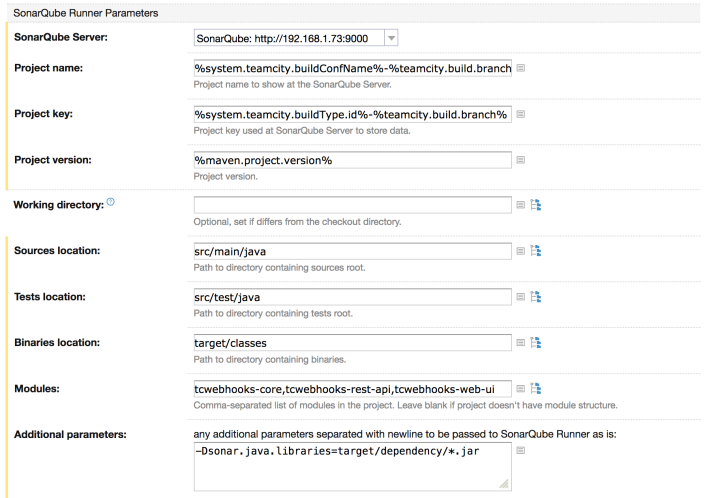
- Project name
I am using a name based on the the build name and branch. This means that each build is in Sonar is at the top level as a “project”. It works for me because I only have a handful of builds. Using the branch name means that builds from different branches have their own analysis history. I have a long running branch for the next iteration (which just migrated to master), and a previous release branch which gets maintenance fixes. - Project key
This uses the same logic as above, but using the id since that won’t contain weird characters. - Project version
Sonar rolls builds of the same version together, so using the maven version allows me to see progress from one release to another, rather than from one build to another. The maven version is typically something like “1.1-alpha11.snapshot“.
I recently changed this from using the TeamCity build number. SonarQube indicates how you are doing compared with the previous version. Using the build number as the version changes the version for every build, so a commit that has some bad stuff makes the analysis go Red, and then the next build it goes Green again which is somewhat misleading. You can see this in the history on the right of the screenshot at the top of this post.
Because I recently changed this, the screenshot above shows “since 170” as that was the build number when I changed that setting. - Sources, Tests and Binaries
These are the standard maven locations for sources and test, but don’t forget to set the binaries location too. This was important for sending the instrumented code to Sonar, otherwise your coverage does not show up in SonarQube. - Modules
These are the sub-modules within my maven build. I would love to not have to specify these here somehow, because if I add a new module in a branch and update this field, sonar fails the build for branches that don’t have the module present. This is a case where having the config in git with the branch would solve this problem. - Additional parameters
This is the magic setting to get annotation generated code analysed properly. Before I added this, I was getting complaints from SonarQube like “Unused private fields should be removed”, even though Lombok has generated getters and setters for them. For this to work, you also need to ask maven to copy the libraries here so that sonar can find them (see next section).
Telling Sonar about Lombok, @NotNull and other annotations
During sonar analysis, I was getting errors similar to:
Class 'abc.xyz.Classname' is not accessible through the ClassLoader.
and Sonar would add failures with “Unused private fields should be removed”. My presumption is that the code used to generate these methods was not available to Sonar at analysis time.
There are two changes I made to resolve this:
- Tell maven to copy its dependencies to somewhere Sonar can find them. This is simple as adding
dependency:copy-dependencies
to the goals that maven will execute, and is configured in the maven build step in TeamCity.
- Add the following to the sonar build step “Additional parameters” (see above section).
-Dsonar.java.libraries=target/dependency/*.jar
Then run your build and watch the good (or bad) news appear in SonarQube.
Lombok and Code Coverage
I love Lombok for reducing boiler plate code. Simply adding @Data to a class adds @ToString, @EqualsAndHashCode, @Getter, @Setter and @RequiredArgsConstructor. With with five extra characters, Lombok adds a lot of new code to my classes but keeps them clean to read.
However, unless I have tests for all this code, it actually drives the coverage down. Sometimes I end up writing extra tests to test Lombok’s code which seems absurd. Other times I replace @Data with the handful of annotations I really need. Some classes need getters on most fields, but only setters on some. After fixing those up, I end up with classes that now have twice as many lines as when I added just the one @Data annotation.
I’ve not really come to a good middle ground on that one. Coverage or clean code. It’s a trade off.
In conclusion
I’ve found SonarQube to be a good spotlight on where my code needs addressing, and have learnt a lot about Java and Java development best practices (according to the “SonarWay”). I was making really good progress on cleaning up some debt and had the bug count down to one! Then I figured out how to fix the missing annotation processing code, and it found 12 new bugs and 91 new code smells. I will endeavour to keep chipping away at it until all the bugs and vulnerabilities are down to zero, and hopefully some debt paid down.
Apart from the coverage dilemma above, SonarQube has been a positive experience. It’s a good way to learn better practices, and be able to chart my progress doing it.
TeamCity WebHooks plugin poll
If you’re a tcWebHooks plugin user, could you please take a couple of minutes to post a comment on this poll?
I am trying to determine how much effort I should invest in supporting older versions of TeamCity, and where to focus future development.
There are some new features in TeamCity 10 which I would like to migrate to, and I am wondering how many tcWebHooks users would be affected by discontinuing support for versions 9.x and below.
Also, how tcWebHooks is being used, and what payload formats are popular.
Many thanks in advance for your time.
tcPrettyEmail updates – branch support and tc9.1.6 fix
This last month has seen a couple of updates to the tcPrettyEmail plugin.
One was a bugfix release to support a breaking change in TeamCity 9.1.6 and the other was adding support for feature branch names.
If you’re running your builds from GIT or Mercurial and have your VCS configured for Feature Branches, then tcPrettyEmail will now print the branch name in the subject and in the overview at the beginning of the email.
Downloads are on GitHub and as usual, please let me know if you experience any problems with either of these releases.
New tcWebHooks release for TeamCity 9.1
The recent release of TeamCity 9.1 caused an issue with webhooks failing to be sent under certain specific conditions.
The Branch object supplied by TeamCity as part of an sBuild now contains references to the parent project, which then contain references back to the build which contains a reference to the Branch.
This creates a circular reference which prevented the Xstream library from serialising the webhook payload.
This would only present if one was running a build from a VCS that supported branches (Git or HG) and it was a non-master build (eg, feature branch) and the payload was XML or JSON.
I have worked around this by creating a simple bean and copying just the relevant parts of the branch to the bean which is then serialised in the webhook content.
I also found an issue with creating new webhooks in the _Root project. The “create webhook” message was sent to TeamCity when the webhook editing dialog closed, but the new webhook was never actually being created. This has now been resolved.
Currently, sourceforge is preventing me from adding new release files for download.
I therefore, think now is the time to move to GitHub for releases. The updated release (v0.9.35.72) can be downloaded from https://github.com/tcplugins/tcWebHooks/releases
As usual, any issues can be raised on GitHub or posted on the tcWebHooks bugs page.
Additional Feature: Double template rendering passes.
Messages passed to webhooks payloads containing ${variables} are now parsed twice. This means that custom messages can contain tcWebHook variables as requested in a comment on the blog. You can read more in the commit message.
Don’t use Eclipse’s web viewer for Cobertura reports…
… or Javadoc, or anything with frames.
It doesn’t appear to refresh correctly, and I was missing updates to my coverage.
Load them in a real browser instead.
HABDroid UI concept – OpenHAB for Android
I’ve started automating some of my home using OpenHAB. As a Java programmer it fits into where my skills are and Kai has done an excellent job building an extendable platform. The community support is excellent with a passionate and helpful user base. I’ve managed to cobble together a serial binding for my Oppo bluray player, which I need to extend and then contribute back to the project. It currently just powers the device on and off, sets the verbosity mode to send updates and then listens for status updates for changes in state (playing, stopped, etc). There is a lot more in the Oppo API which I should add and test.
I’m also an Android user and have done some development. So I downloaded a recent debug HABDroid APK from cloudbees and am trying it out. Most of the commits appear to be the work of belovictor and he’s done an amazing job on this app. I especially like the Material updates applied in the recent cloudbees builds.
The HABDroid app does seem to focus on Items and their statuses rather than leading the user through Task based execution. This could be because that’s what most of the example Site map files show, or it could be factor of the target audience OpenHAB is currently aimed at. This audience appears to be developers or tinkerers, rather than their families or housemates.
This got me thinking. If I am to subject my family to the OpenHAB experience, I would like it to be simple, convenient and user friendly. The MythTV community talks a lot about WAF, or Wife Acceptance Factor. I believe UX plays a large part in this. To this end, I have been mulling over some UI concepts that I think could add a bit more “wow” and “WAF” to HABDroid, and which embrace the animations and transitions now available in Android’s material design.

Click to view at full size
The above animation is scaled down due the limitations of the theme on this blog. To view it properly, I suggest you click it and see it full size.
Credits and attributions
The following items were used in this mock up.
- Climacons – Used for the weather icon
- Jeremy from Sallee Design – The speaker icon is in the music set on this page
- SAMURAY – The popcorn icon is a member of the Movie Icon Set
- PSDgraphics – Have the retro TV icon
- The XBMC logo is copyright to the XBMC project. Somehow I missed the name change to Kodi. I’m still running an old XBMC on my RaspberryPi.
- Icons for YouTube, BBC iPlayer and Netflix are copyright to their respective companies. Used without seeking permission.
The HABDroid UI Concept
The UI shown in the animation above introduces a few new concepts:
- A grid view and a lot more control over layout and colour
- Changing colour schemes between fragments
- Animation of the selected item and fragment transitions
- Automatic execution of Item state changes
- An “Intent” Item which allows starting another Android application via an Intent
A grid view and a lot more control over layout and colour
In my household, the interface to OpenHAB is the tablet. HABDroid currently supports a tablet experience by presenting the menus on the left and items on the right. I believe the introduction of a grid view and larger interaction icons suits the task focused, tablet experience well.

For the above layout to be successful, I believe there needs to be additional rendering specifics.
Much more control is needed on Frames. They should be able to consume less than 100% of their parent width, and have alignment capability. I believe the above could be configured like this:
sitemap home label="Welcome to OpenHAB"
                   layout="vertical"
                   darkPrimaryColor="#9e9e9e"
                   primaryColor="#616161"
                   accentColor="#b6b6b6"
                   primaryTextColor="#b6b6b6" {

        Frame layout="grid" h-margin="3%" h-padding="20dp" {
                Group item=GF_Watch label="Watch" icon="popcorn"
                   layout="grid"
                   h-margin="3%" h-padding="20dp"
                   darkPrimaryColor="#b52d38"
                   primaryColor="#e34143"
                   accentColor="#b6b6b6"
                   primaryTextColor="#b6b6b6" {

                        // more items in here
                }
                Group item=GF_Listen label="Listen" icon="speaker" {

                        // more items in here
                }
        }
        Frame layout="horizontal" h-align="right" h-margin="3%" {
                Text label="London" right-padding="10sp"
                Image label="" item=WeatherIcon
                Text label="[%s]" left-padding="10sp" item=WeatherTemp
        }
        Frame layout="horizontal" h-margin="15%" color="#b6b6b6"
              top-padding="1dp" bottom-padding="0px"
              h-padding="0px" bottom-margin="20dp" {
                // Draws a 1dp line across the screen by colouring
                //  a Frame and making it thin and wide.
        }
}
| Elements | Property | Values | Notes |
|---|---|---|---|
| Sitemap, Frame, Group, List?? | layout | vertical, horizontal, grid | Vertical is what HABDroid currently renders. Horizontal is a single line horizontally. Grid displays the items in a grid layout. |
| All Item types | margin, v-margin, h-margin, left-margin, right-margin, top-margin, bottom-margin | examples: 10%, 25dp, 15px, 11sp | Percentage of parent framesize would be a good starting point, but it would also be useful to be able to specify a value that would not change between the four margins. DP is obviously very Android specific. It stands for device pixels and is a scaled pixel count, so that pixels appear to be a similar size for different screen densities PX is for precise amount should it be needed SP is scaled pixels and is similar to DP but factors in the user’s font size settings on the device. |
| All Item types | padding, v-padding, h-padding, left-padding, right-padding, top-padding, bottom-padding | examples: 10%, 25dp, 15px, 11sp | Percentage of parent framesize would be a good starting point, but it would also be useful to be able to specify a value that would not change between the four sides. DP is obviously very Android specific. It stands for device pixels and is a scaled pixel count, so that pixels appear to be a similar size for different screen densities PX is for precise amount should it be needed SP is scaled pixels and is similar to DP but factors in the user’s font size settings on the device. |
| All Item types | v-align, h-align | center, top, bottom, left, right (as applicable) | How to align the item within its parent |
| Frame, Group | color | same as current labelcolor and valuecolor settings | Sets the background colour of a Frame |
| All Item types | label=”” | Ability to set the label to be empty. | I’m not sure if this is currently possible. However, I expect the label to take up no space (visibility=gone in Android) if it’s empty. This is much more applicable for horizontal and grid views than vertical. |
Changing colour schemes between fragments
Since a fragment is represented by a Group in the sitemap (as far as I can tell), adding the colours to the Group element would go a long way to being able to define how a fragment is coloured. Additionally, there is a new library called “Palette” with Android 5 (and backported to previous versions) which allows developers to extract colours from an image and use those colours in the UI. In my experience this is a good start but does not always achieve the nicest looking design. The result varies greatly depending on the image. For some images, the palette library is unable to determine anything other than the Primary colour. Images with large single colour areas seem to suffer this problem.
Therefore, it is advantageous to be able to specify colours rather than relying on the palette library. If no colours are provided in the sitemap, palette could then be invoked to colour the UI based on the icon the user had selected.
To give maximum flexibility in rendering the UI, and to adhere closely to the Material design recommendations, the following colours would need to be able to be specified for a Group.
- Dark primary color
- Primary color
- Light primary color
- Primary text color
- Secondary text color
- Accent color
- Icon color
- Divider color
A useful visualisation of how these colours are used is available on the materialpalette.com website.
Animation of the selected item and fragment transitions
Another feature of modern Android design is the use of animation to indicate to the user how an interaction transitions to a new screen. With recent additions to the Android API, it is now possible to animate transitions from one Activity or Fragment to another, with common elements remaining on screen. I believe it is now possible to achieve the transition effect shown in the animation above. This would go a long way to adding some extra polish to the UI, and giving some good visual clues about how the screens tie together.
Automatic execution of Item state changes
When HABDroid loads a fragment, and an Item in that fragment’s Group has a property of “automatic”, then HABDroid requests OpenHAB to change the state of that Item to the state of the automatic property. For example,
Switch item="switch01" automatic="on"
would tell HABDroid to call the OpenHAB API and set the value of switch01 to the on state if it is not already in that state.
I’m still not completely convinced about this idea, but propose it as I think there are some use cases where it could be a useful feature.
An “Intent” Item which allows starting another Android application via an Intent
As I eluded to earlier, the tablet is our primary interaction tool with OpenHAB. The tablet is also the tool we use for interacting with a number of other devices in the house. For example, we have apps that allow us to control XBMC, the Oppo Bluray player, MythTV, YouTube, MPD and initiate DLNA streams. The logical next step is to allow HABDroid to be able to start these apps when appropriate.
To support this, I propose a new Item be added to OpenHAB, which is an Intent item. Its purpose is to inform HABDroid which Intent to broadcast to the Android OS to start the relevant controller app. In the animation above, OpenHAB presents to the user an icon they can touch to start the XBMC controller application. To be as powerful as possible, the Item should allow “extras” to be configured, so that any context that the app could take advantage of can also be transferred.
It might be useful for HABDroid to allow the user to determine an App’s intent and be able to present a Share button. This is to send the intent detail to the OpenHAB administrator’s email address or similar, since the sitemap normally resides on another computer.
Comments and responses
I’ve opened a ticket on Github. Please post comments and responses there so they are all in one place.
New tcWebhooks payload format : Tailored JSON
Introducing a new payload format called Tailored JSON in tcWebhooks version 0.9.27.61
This format only sends the contents of the “body” parameter as application/json. It is up to the user to define the content of the body parameter.
The easiest way to define the body is with a TeamCity build parameter called webhook.body as per the screenshot below.

